We Seem Lately To Be On An Organization Mission To Get Tools Organized And Straighten Out The Mess Of Stuff In The Garage
With This In Mind, We Wanted Some Shelves Which Were Movable, Easily Constructed And Able To Be Dismantled When The Time Came To Move Or Do More Rearranging Of The Space
We Looked Around And Found This Great Set Of Instructions On The Site : Instructables

As You Can See, This Set Of Shelves Seemed To Perfectly Fit Our Requirements
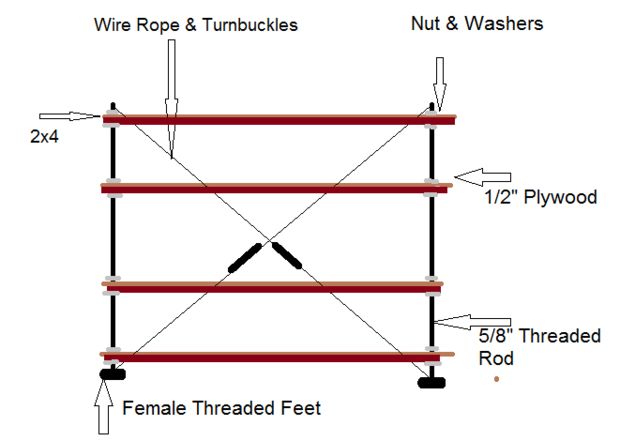
Go On To The Next Page For The Schematic And Some InstructionsHere Is The Basic Diagram

You Will Need The Following Materials:
2 Sheets of 1/2 ” or 5/8 ” Plywood
2 x 4’s Cut To Length
5/8 ” Threaded Rod
Various Nuts And Washers To Fit
1/8 ” Wire Cable For Tension
Turnbuckles
Crimp On Ferrules
Vice Grips
Electric Drill
Electric Saw
That’s About It For The Materials
For Instructions, Go Over To Page 3Here Are Basic Instructions :
Assembly is pretty straight forward. On the bottom I used female threaded rubber feet to screw onto the threaded rod. Over the feet put a nut, washer, a 2×4 , plywood (on top of 2×4), washer, and then 2 nuts. the second nut is used to restrain the tension wire loops. The second nut also helps when you go to cinch down the plywood to the 2×4 by acting as a jam nut and keeping the threaded rod from rotating instead of the nut.
Without some sort of reinforcement these shelves would be pretty wobbly. By bracing the shelves with diagonal wire and turnbuckles the shelves become very rigid. I used 1/8″ wire and crimp on ferrules and end stops. This type termination creates a sort of noose where the end stop keeps the wire from slipping out of the ferrule.This is definitely the hack way to create wire loops.
For More Comprehensive And Detailed Pictures And Instructions Visit The Source Of This Project : INSTRUCTABLES
This Is What It Looks Like :